Scheduling a Webinar in your Company Profile
Instructions for scheduling a webinar
Scheduling a webinar is done in 4 easy steps: Entering webinar details, Choosing the webinar host, Adding presenter(s), and Adding content like a Powerpoint presentation. The webinars you schedule will be displayed in your Company Profile.
Webinar Details
Title. Choose a catchy title that will attract your audience. Titles that start with ‘How to…’ or ‘5 Best ways to…’ usually perform well. Also make sure that your title contains searchable keywords so that it can be found on Google for example.
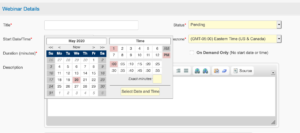 Date and Time. Use the calendar tool provided to set the start date and time for your webinar. It takes 5 clicks to set a date and time. Click 1 on the left is to select the Date (Nov 25 in this example). Click 2 on the right is to select the start hour (‘2′ in this case). Click 3 is to select the start minutes (’00’). Click 4 is to select AM or PM (‘PM’). And Click 5 is to select and save the Date and Time. The selected date and time in this example is: Wednesday November 25, 2024 at 2:00 PM.
Status. As long as the Status of the webinar is ‘Pending’ the webinar will not be publicly displayed. You can make changes to the content and save that information while you’re still confirming date and time, presenter, etc. As soon as you change the status to ‘Active’ the webinar information will be displayed on your company profile.
Duration. It is considered a best practice to limit the length of a Webinar to 60 minutes or less.
Description. Describe the webinar from your audience perspective: why should they attend and what are the key takeaways.
Notes. Use this field to communicate with your colleagues about the planning and progress of activities like: Webex link is ready, Presenter confirmed, Moderator confirmed, etc.
Host and Registration
Host Email. Choose an existing user as host by entering this person’s email address. Then click on ‘Find User’. In case the user doesn’t exist you will get the following message. Click on the link to register a new user.
Webinar Web Site. Select ‘Register here, host at hosting site URL’ if you want to use your company profile for collecting the registrations. The advantage is that you can run reports with overviews of who registered and when, including email addresses and contact information of the people who registered. The drawback is that people will have to register again in the web conferencing tool when they access the webinar. Select ‘Link to register and host at Hosting site URL’ if you do not want to use your company profile for collecting registrations, but only as a public webinar calendar which redirects people who are interested on to another website or to the web conferencing tool. In both cases you should add the url of the webpage where people can register for the webinar in the field ‘Hosting Site URL’.
Contact Us here if you do not have your own webinar management platform, and are interested in our webinar production services.
Presenters
Similar to trade shows or conferences a good keynote attracts the audience. The same counts for webinars. Having guest speakers at a Webinar is also good when it comes to improving attendance rates. Choose an existing user as Presenter by entering this person’s email address. Then click on ‘Find User’. In case the user doesn’t exist you will get the message shown above at Host and Registration. Click on the link to register a new user.
It’s important that the presenter’s bio and photo are uploaded into his/her personal profile. These will show up in the webinar details page after the webinar Status is changed to ‘Active’.
You can add multiple presenters.
Content
You can upload a presentation by clicking on the ‘Browse’ button and selecting a ppt from your files. Please note that the file size of the ppt you are uploading should be less than 10 Mb!
Corrections? Comments? Send us an email